How to add a Project ?
Instructions - Create the repository using existing template
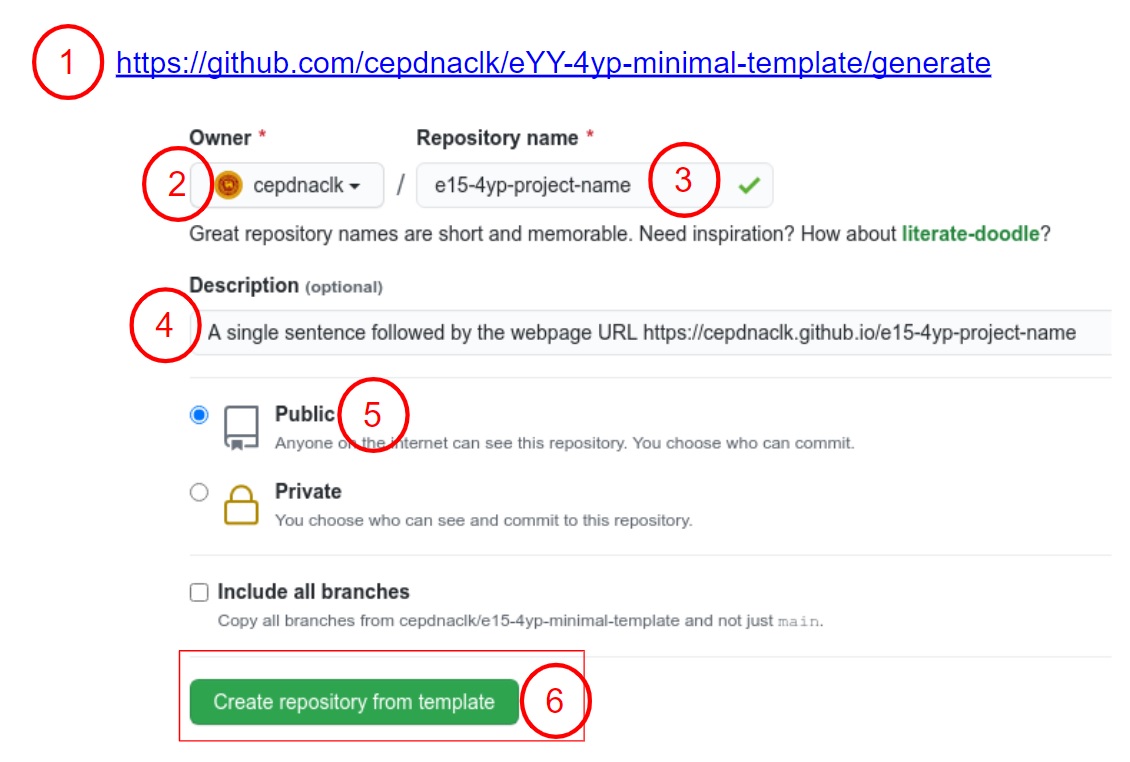
1. First create a repository on cepdnaclk GitHub organization using one of the following template. (Click on the relevant link)-
General Template for Course Projects
https://github.com/cepdnaclk/eYY-XXX-project-template/ -
Software Systems Design Project Template
https://github.com/cepdnaclk/eYY-co2060-project-template/ -
Cyber-Physical Systems Project Template
https://github.com/cepdnaclk/eYY-3yp-project-template/ -
Undergraduate Research Project Template
https://github.com/cepdnaclk/eYY-4yp-project-template/ -
Minimal Template
https://github.com/cepdnaclk/eYY-4yp-minimal-template
2. Select the Owner as “cepdnaclk”
3. Name your repository, according to the below naming convention.
eYY-CATEGORY-TITLE
- YY : 2 digit batch number
- CATEGORY : One of the following supported category tags
- TITLE : A suitable name for your project (You can use both capital and simple letters, words can be seprated using ‘-‘)
Ex: For E15 Final Year project: e15-4yp-Project-NameCATEGORY assigned as follows,
| CATEGORY | Project / Course |
|---|---|
| 4yp | Undergraduate Research Project |
| 3yp | Cyber-Physical Systems Project |
| co2060 | Software Systems Design Project |
| 6sp | Sixth Semester Project |
| co225 | Software Construction Projects |
| co227 | Software Systems Projects |
| co328 | Software Engineering Project |
| co226 | Database Projects |
| co326 | Computer Systems Engineering Projects |
| co502 | Advanced Computer Architecture |
| co543 | Image Processing |
| co542 | Neural Networks |
| co544 | Machine Learning |
4. Add a proper description about your project in between 100-150 words.
5. Select the visibility as Public .
6. Click on the Create repository from template button.
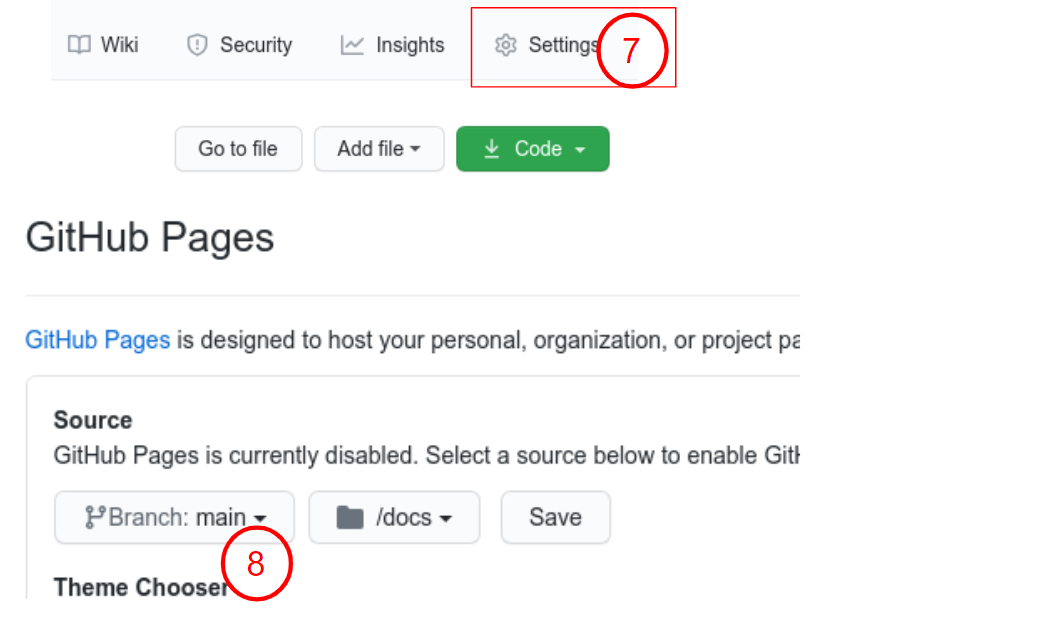
7. Go to settings and scroll to the GitHub pages section.
8. Select branch as Main and Folder as /docs and save.
9. Now you can goto the repository and edit your GitHub page by editing the
/docs/README.md
. (The webpage shown in
https://cepdnaclk.github.io/{your-repository-name}
will be automatically generated.
[Example]
)
Note: if you are using a
‘Minimal’
template, you need to design this project page by your own, by editing
/docs/index.html
10. You can share your project’s source code / implementations into this repository, by uploading them into the root folder of the repository.
11. These projects will be automatically added into https://projects.ce.pdn.ac.lk , with given title and description. If you like to show more details about your project on this site, you can fill the JSON file, /docs/data/index.json (Note: Different templates may have different sets of parameters, as requested by the course coordinators)
{
    "title": "This is the title of the project",
    "team": [
    {
        "name": "Team Member Name 1",
        "email": "email@eng.pdn.ac.lk",
        "eNumber": "E/yy/xxx"
    },
    {
        "name": "Team Member Name 2",
        "email": "email@eng.pdn.ac.lk",
        "eNumber": "E/yy/xxx"
    },
    {
        "name": "Team Member Name 3",
        "email": "email@eng.pdn.ac.lk",
        "eNumber": "E/yy/xxx"
    }
    ],
    "supervisors": [
    {
        "name": "Dr. Supervisor 1",
        "email": "email@eng.pdn.ac.lk"
    },
    {
        "name": "Supervisor 2",
        "email": "email@eng.pdn.ac.lk"
    }
    ],
    "tags": ["Web", "Embedded Systems"],
    "image":"cover_page.jpg",
    "thumbnail":"thumbnail.jpg"
}
- Once you filled this index.json file, please make sure the syntax is correct. (You can use this tool to identify syntax errors)
- Please include the "correct" email address of your supervisors. (You can find them from https://people.ce.pdn.ac.lk/ )
-
Please include an appropriate cover page image (
cover_page.jpg
) and a thumbnail image (
thumbnail.jpg
) in the same folder as the
index.json
(i.e.,
/docs/data). The cover page image must be cropped to 940×352 and the thumbnail image must be cropped to 640×360 . Use https://croppola.com/ for cropping and https://squoosh.app/ to reduce the file size. - If your followed all the given instructions correctly, your repository will be automatically added to the department's project web site (Update daily)
- A HTML template integrated with the given GitHub repository templates, based on github.com/cepdnaclk/eYY-project-theme . If you like to remove this default theme and make your own web page, you can remove the file, docs/_config.yml and create the site using HTML.